Fill Dirt for Retaining Wall
Calculate Drainage Gravel, Backfill Dirt, and prevent Hydrostatic Pressure failure.
Pro Fill Dirt Calculator
Accurate estimates for Yards, Tons, & Compaction
Results
How to Calculate for Fill Dirt for Retaining Wall
The Formula
We calculate two separate volumes: the 12-inch drainage gravel column immediately behind the wall, and the general fill dirt zone behind that. Both require compaction adjustments.
Measure Accurately
Measure in feet. For depth, measure in inches and our tool handles the conversion (divide by 12).
Check Your Shape
Most fill dirt-for-retaining-wall projects are rectangles. If irregular, break it into smaller shapes.
Add Compaction
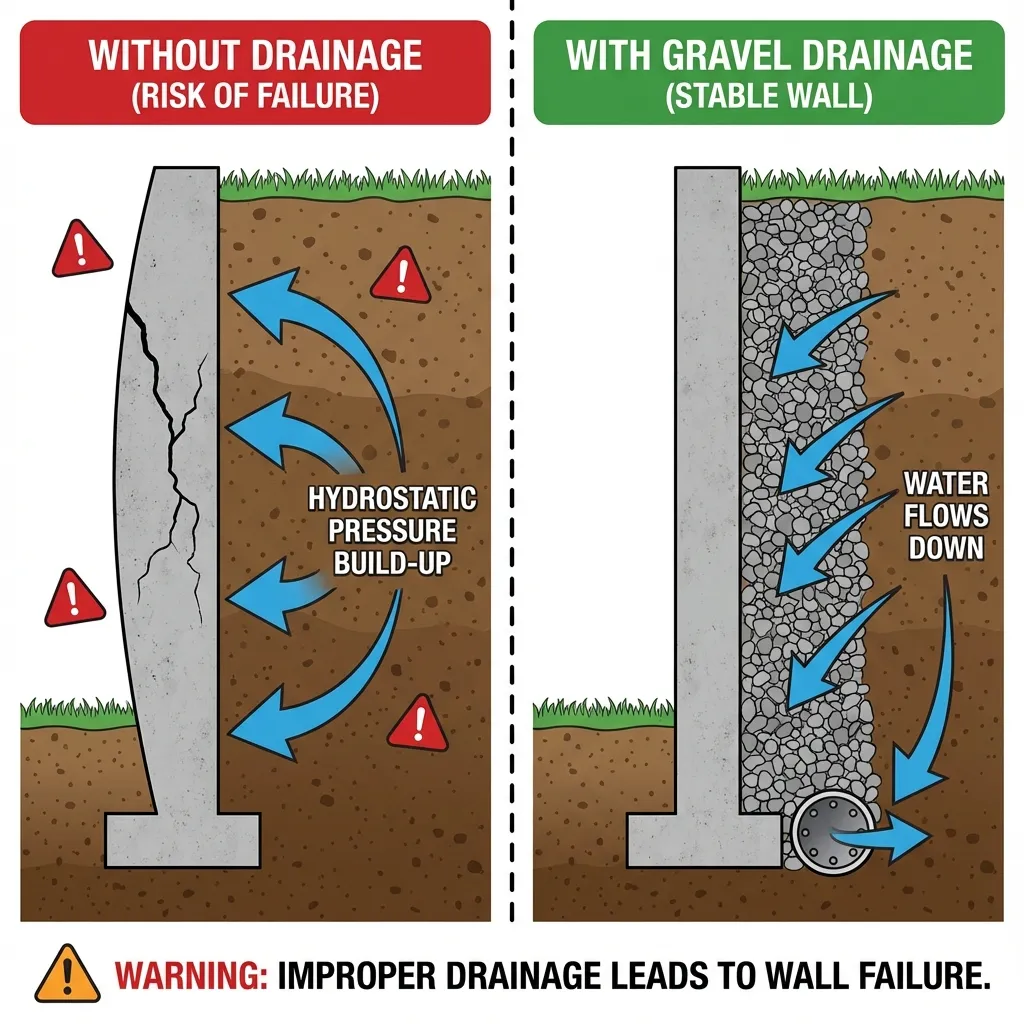
Using only dirt behind a retaining wall traps water (Hydrostatic Pressure), which is the #1 cause of wall collapse. You must calculate for a gravel drainage zone.
Building a retaining wall is one of the most rewarding landscape projects, but it carries a hidden risk that destroys over 60% of DIY walls within five years: Hydrostatic Pressure. If you simply dump "fill dirt" directly against the back of your wall, you are creating a ticking time bomb.
To build a wall that lasts decades, you need to calculate materials for two distinct zones: the Drainage Zone (gravel) and the Backfill Zone (dirt). This guide and our specialized calculator will help you determine exactly how much of each material you need, preventing costly ordering mistakes and catastrophic wall failures.
Why You Can't Just Use "Dirt" Behind a Retaining Wall
The soil behind your retaining wall does more than just sit there; it exerts force. Dry soil exerts horizontal pressure, but wet soil is the real enemy. When soil gets saturated, two things happen:
- 1.Weight Increase: Dry soil weighs about 100 lbs per cubic foot. Saturated soil can weigh over 130 lbs per cubic foot.
- 2.Fluid Pressure: Water trapped in the soil pushes outward against the wall with immense force, known as Hydrostatic Pressure.
The Warning: If you use clay-heavy dirt right up against the blocks, water cannot escape. It builds up year after year until the wall bows, cracks, and eventually collapses.
The "Two-Zone" Backfill Strategy
Professional excavators and hardscapers never order just one type of material. They divide the space behind the wall into two critical zones. Our calculator helps you estimate volumes for both.
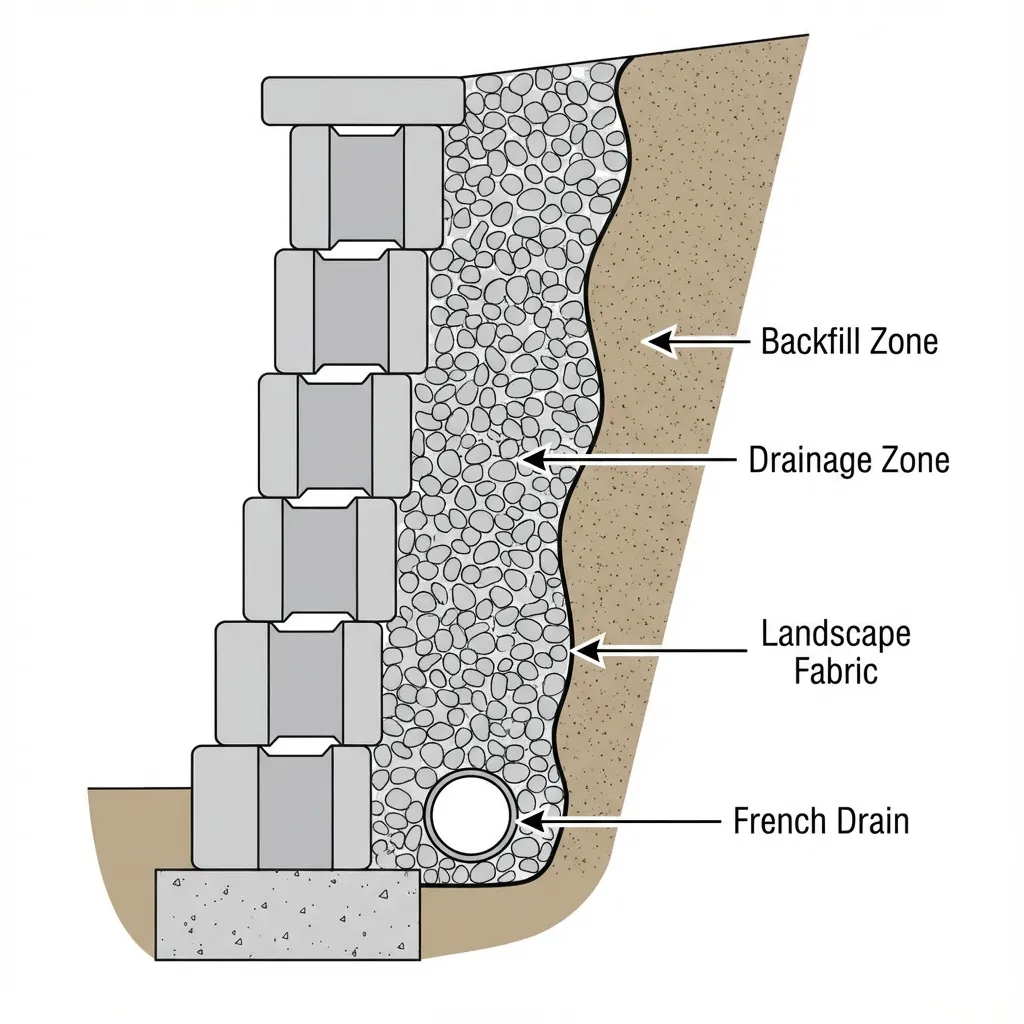
Zone A: The Drainage Zone
This is the vertical column directly touching the back of the wall. It acts as a super-highway for water to flow vertically down to the drain pipe.
- • Material: Clean Crushed Stone (#57) or "Clear Stone".
- • Width: Minimum 12 inches (1 ft) thick.
- • Function: Zero water retention.
Zone B: The Backfill Zone
This is the remaining space between Zone A and the undisturbed native soil slope. This is where you can save money by using cheaper dirt.
- • Material: General Fill Dirt or Native Soil (if safe).
- • Width: Varies based on excavation cut.
- • Function: Mass and structural support.
Step 1: Calculating the Drainage Gravel Impact
To calculate the gravel needed for proper drainage, you simply calculate a rectangular volume that mimics the face of your wall, but only 1 foot thick.
Detailed Example:
Let's say you are building a wall that is 40 feet long and 4 feet high.
- Calculate the Face Area: 40 × 4 = 160 sq ft.
- Multiply by Thickness (1 ft): 160 × 1 = 160 cubic feet.
- Convert to Yards: 160 ÷ 27 = 5.92 Cubic Yards of #57 Stone.
*Note: Always order 5-10% extra gravel to account for spillage and bedding the pipe.
Step 2: Calculating the Backfill Dirt
The amount of fill dirt you need depends on how wide you cut your trench. A recommended safe workspace trench is often 2 to 3 feet wide behind the wall blocks.
Fill Dirt Needed = Total Trench Volume - Gravel Volume
Using the same examples above (40' long, 4' high), but with a trench that is 3 feet wide total:
- Total Excavated Volume: 40 × 4 × 3 = 480 cubic feet.
- Subtract Gravel Zone: 480 - 160 = 320 cubic feet of space left for dirt.
- Convert to Yards: 320 ÷ 27 = 11.85 Cubic Yards of Fill Dirt.
Why "Free Yard Dirt" Might Cost You Everything
Many homeowners try to save money by backfilling with the dirt they just excavated. This works fine if your soil is sandy or loamy. However, if your soil is Expansive Clay, putting it back behind your wall is a major structural error. Clay absorbs water and swells, exerting massive pressure.
The "Ribbon Test": Can I use my dirt?
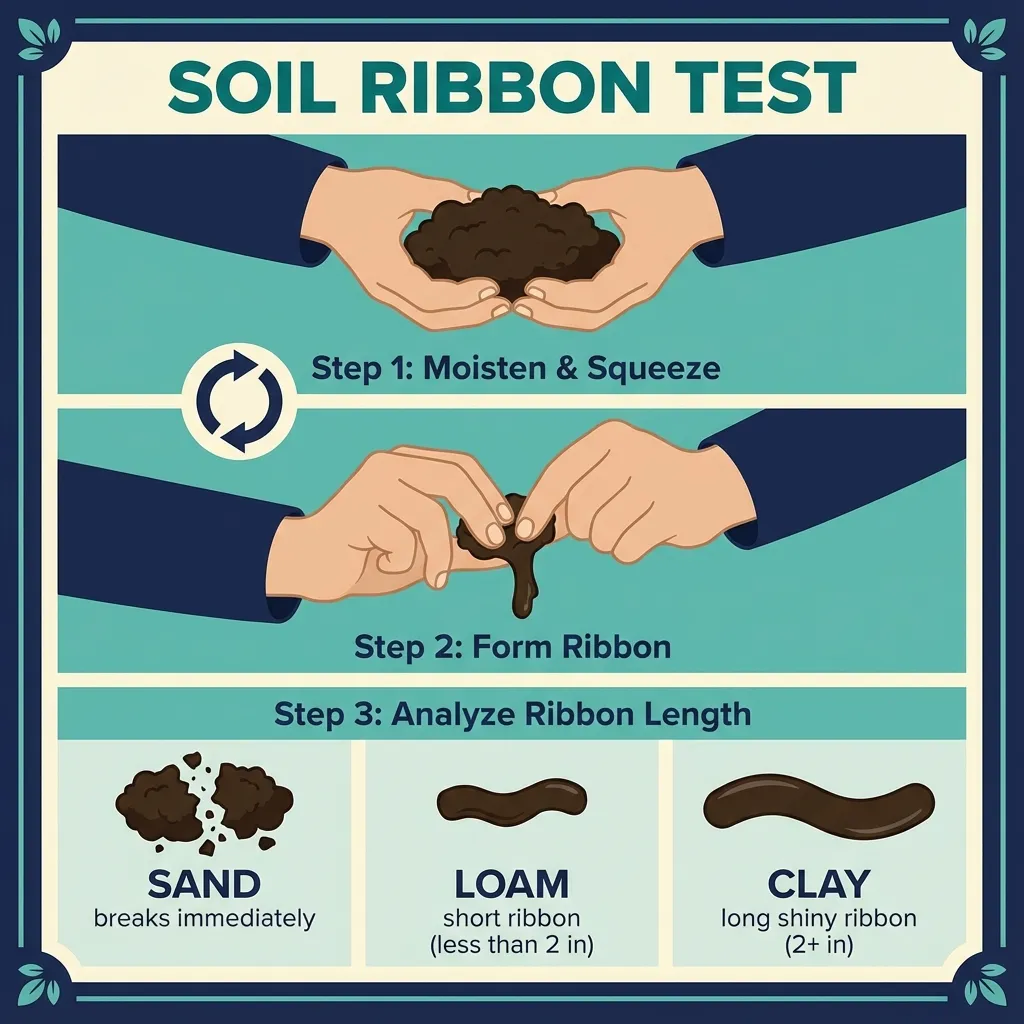
Take a handful of your moist soil and try to squeeze it into a ribbon between your thumb and forefinger.
- Safe to Use
Ribbon breaks before reaching 1 inch. Sandy/Loamy soil drains well. - Use with Caution
Ribbon reaches 1-2 inches. Mix with sand or increase gravel zone width. - Do Not Use
Ribbon stretches 2+ inches. Heavy Clay. Will destroy wall. Buy "Select Fill".
Understanding Compaction & Shrinkage
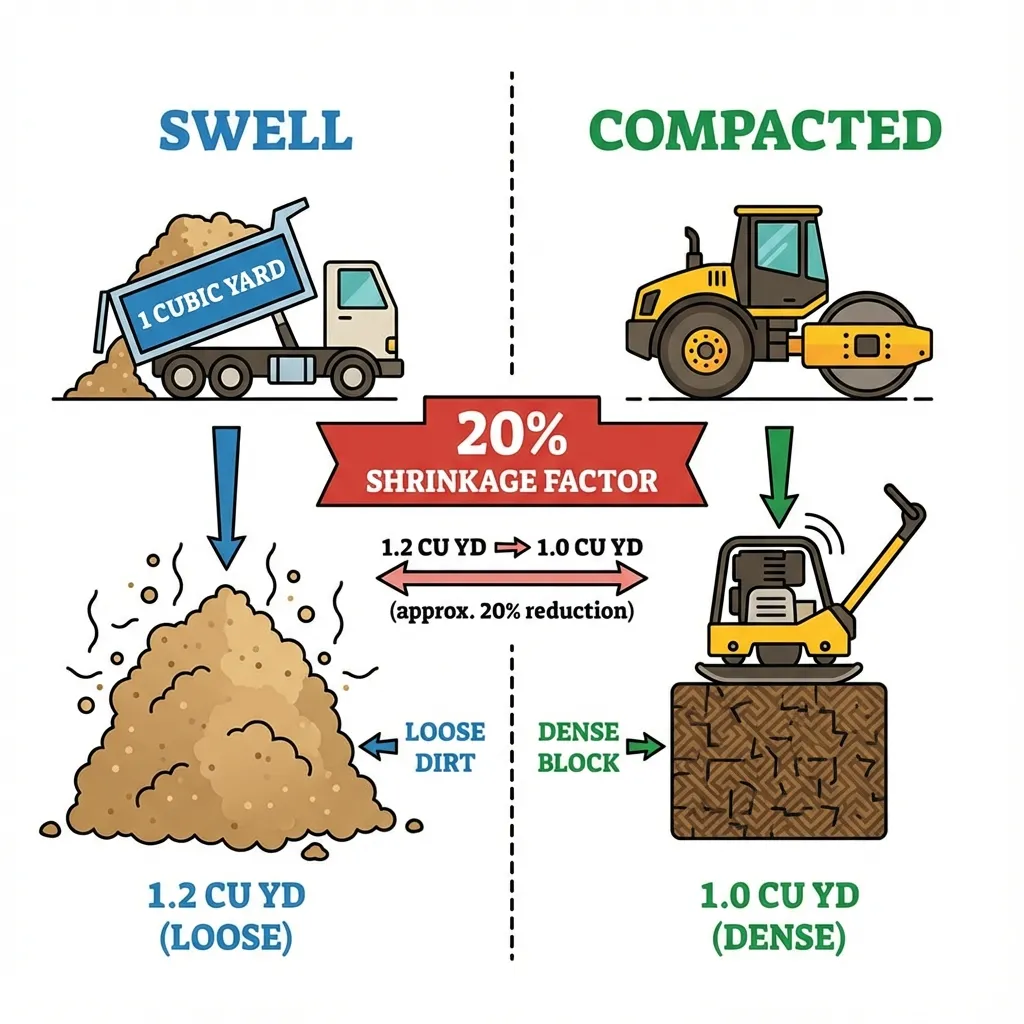
When you dig dirt out of the ground, it "fluffs up" (bulking). When you put it back and compact it with a tamper, it shrinks. To end up with a level surface, you must order more than the measured hole volume.
The "20% Rule": Always add 20% to your fill dirt calculation for compaction. Learn more about compaction calculations.
| Material Type | Compaction Factor | Recommendation |
|---|---|---|
| Clear Stone (#57) | 5% - 8% | Self-compacting; just requires light tamping. |
| Sand / Gravel Mix | 10% - 15% | Compacts easily; excellent backfill. |
| General Fill Dirt | 15% - 20% | Standard requirement for most calculators. |
| Heavy Clay | 25% - 35% | Hard to compact; voids likely. Avoid. |
Critical Components You Cannot Skip
1. Perforated Drain Pipe
A 4-inch perforated pipe must effectively run the entire length of the wall properly. It sits at the very bottom of the gravel zone.
Pro Tip: Always place the holes facing DOWN, not up. This allows water rising from the soil to enter the pipe before it saturates the base.
2. Geotextile Landscape Fabric
This is the "coffee filter" of your wall. You must place Non-Woven Geotextile Fabric between the dirt zone and the gravel zone. without this, rain will wash fine silt from the dirt into your gravel, clogging it up like concrete and killing your drainage.
3. The Impermeable Cap
The top 6 inches of your backfill should NOT be gravel. It should be "impermeable soil" (like the clay you dug out earlier) or sod. This acts as a roof, shedding surface rainwater over the wall rather than letting it soak down behind it.
Build It Right, Build It Once
A retaining wall is only as strong as its drainage system. Don't skimp on the gravel and don't guess on the dirt volume. Use the calculator above to separate your orders, and ensure your hard work stands the test of time.
Frequently Asked Questions
Can I just use sand for backfill?
Sand is an excellent backfill material because it drains well and compacts easily. However, it is expensive. The most cost-effective method is using #57 stone for the immediate 12 inches and general fill dirt for the rest.
How wide should the gravel backfill be?
The industry standard is a minimum of 12 inches (1 foot) directly behind the wall blocks. For walls taller than 4 feet, engineers often recommend 18-24 inches of gravel to reduce pressure further.
Do I really need a drain pipe?
Yes. The gravel collects the water, but the pipe moves it away. Without a pipe, the gravel column just becomes a holding tank for water, which will eventually saturate the soil and push the wall over.
What is surcharge loading?
Surcharge loading refers to extra weight placed on top of the soil behind the wall, such as a parked car, a patio, or a shed. If you have surcharge loads, you cannot use standard backfill ratios; you need more gravel and geogrid reinforcement.
Can I build a driveway on top of fill dirt?
No. Fresh fill dirt will continue to settle for years. Driveways require 'Structural Fill' compacted in 6-inch lifts to 95% density, tested by a pro.